
Ever thought about giving your tank a system made just for it? Many fellow aquarists say that store-bought sumps seem too off the shelf and cost a pretty penny.
I once heard about someone who built a glass sump for much less money. It ran like a dream, working as smoothly as a gentle stream.
A custom sump lets you set up separate spots for cleaning. This makes maintenance easier and keeps your aquatic world sparkling.
In truth, this guide walks you through each step to build a water-cleaning system that fits your needs perfectly, so you can enjoy watching your little water world thrive.
Why Choose a Custom Aquarium Sump: Benefits and Overview
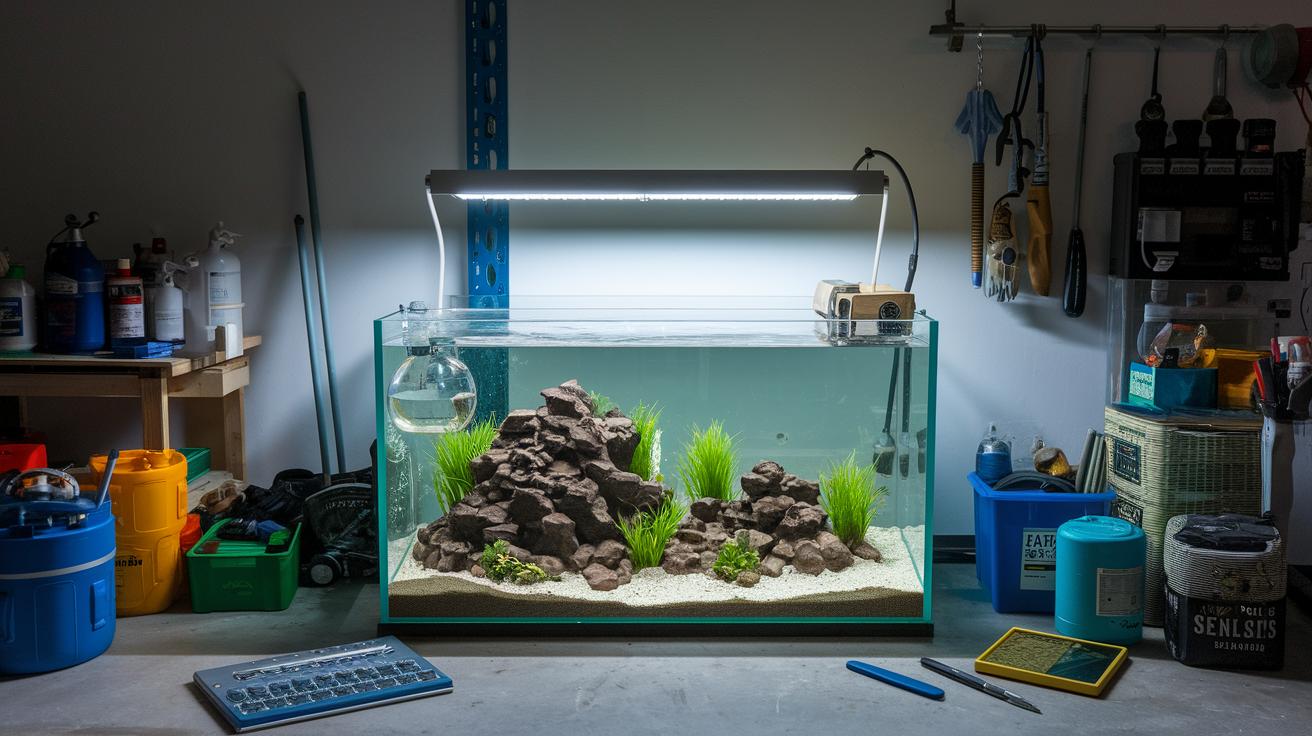
Building your own aquarium sump lets you design a filtration system that fits your tank perfectly. For example, glass sumps are a smart choice because they are not only cheaper but also tougher than acrylic. I remember hearing about a 40-gallon glass breeder sump built for just $65. Wow, right? This shows that you can save money without giving up quality, sometimes, a glass sump costs less than half of its acrylic alternative and still works like a charm.
Custom sumps give you the freedom to organize your filtration by separating mechanical, chemical, and biological cleaning processes into different compartments. This setup helps each part do its job really well. Plus, you get to create dedicated spots for your equipment like skimmers, reactors, and probes, which makes maintenance and upgrades a breeze. For instance, adding a smoked baffle in the saltwater area can stop algae from building up in your refugium, boosting performance over the long haul.
If a freshwater setup is more your style, you might use K2 media floating plastic filter media. This option breaks down waste effectively and offers a fresh twist on traditional setups. With a custom sump, you can size each compartment just right to safely handle water flow and any extra volume when water overflows or drains.
In truth, designing your own sump means you don't have to settle for store-bought designs. You create a system that meets both your technical needs and aesthetic dreams, like crafting a little underwater treasure that keeps your aquatic world thriving.
Planning Your Aquarium Sump Design and Layout
When planning your aquarium sump design and layout, you're setting up your tank for a smooth and happy life. Start by exploring different sump ideas and be sure to think about your skimmer's size. For example, if you have a 10" by 10" skimmer, you might need around 8" of water to work properly, which shapes your whole design. A little fun fact to kick things off: before Marie Curie became famous, she used to carry test tubes with radioactive material in her pockets, not knowing the risks ahead.
Next, take a moment to calculate the sump's total volume. Multiply the length, width, and height of your compartment to find out its size in cubic inches, then convert that number into gallons. Always allow for an extra 50 to 100% capacity. This extra space acts like a safety net, helping to manage water surges and keep your tank's water level steady. And don't forget to factor in the height of your overflow setup and include an emergency drain to prevent any accidental spills.
For saltwater tanks, consider using smoked baffles to help slow down algae growth in key spots. And for freshwater setups, a K2 media refugium, which uses floating, continuously tumbled plastic media, can break down waste while supporting good bacteria. Every detail of your custom sump, from volume calculations to overflow planning, comes together like the gentle ripple of water, creating a balanced and efficient system for your underwater world.
Gathering Materials and Tools for Your DIY Aquarium Sump
Imagine you're about to create a mini underwater world. To start, jot down the basic supplies. You'll need a 40-gallon glass tank (think about spending around $65), paired with custom-cut glass baffles (about $20) to help guide your water flow. Add in an aquarium-grade silicone tube, some sturdy PVC pipe, bulkhead fittings, and a handy filter sock holder kit. For keeping the water dancing nicely, a return pump that moves between 150 and 200 gallons each hour is a solid pick.
Think of planning your materials like writing down a special recipe for your aquarium. When picking out your glass baffles, you might say, "I'm all in on strong, custom glass to lock my sump’s layout in place." And here’s a friendly tip: check out "aquarium supplies online" at https://sweetfysh.com?p=347 for a reliable source on all these parts.
Now, don’t forget to gather the right tools to make your project swim smoothly. You might need a glass cutter if you plan on making your own cuts, measuring calipers to keep your dimensions spot-on, a caulk gun for the silicone, and a bit of sandpaper to smooth any rough glass edges. With all these tools and supplies at hand, you’re all set to build your sump with confidence!
| Item | Cost |
|---|---|
| 40-gallon glass tank | $65 |
| Custom-cut glass baffles | $20 |
| Aquarium-grade silicone tube | – |
| PVC pipe | – |
| Bulkhead fittings | – |
| Filter sock holder hardware | – |
| 150–200 GPH return pump | – |
Before you dive in, double-check that every tool and supply is ready. That way, you can enjoy the process as much as the final, tranquil aquarium ambiance.
Step-by-Step Custom Aquarium Sump Fabrication
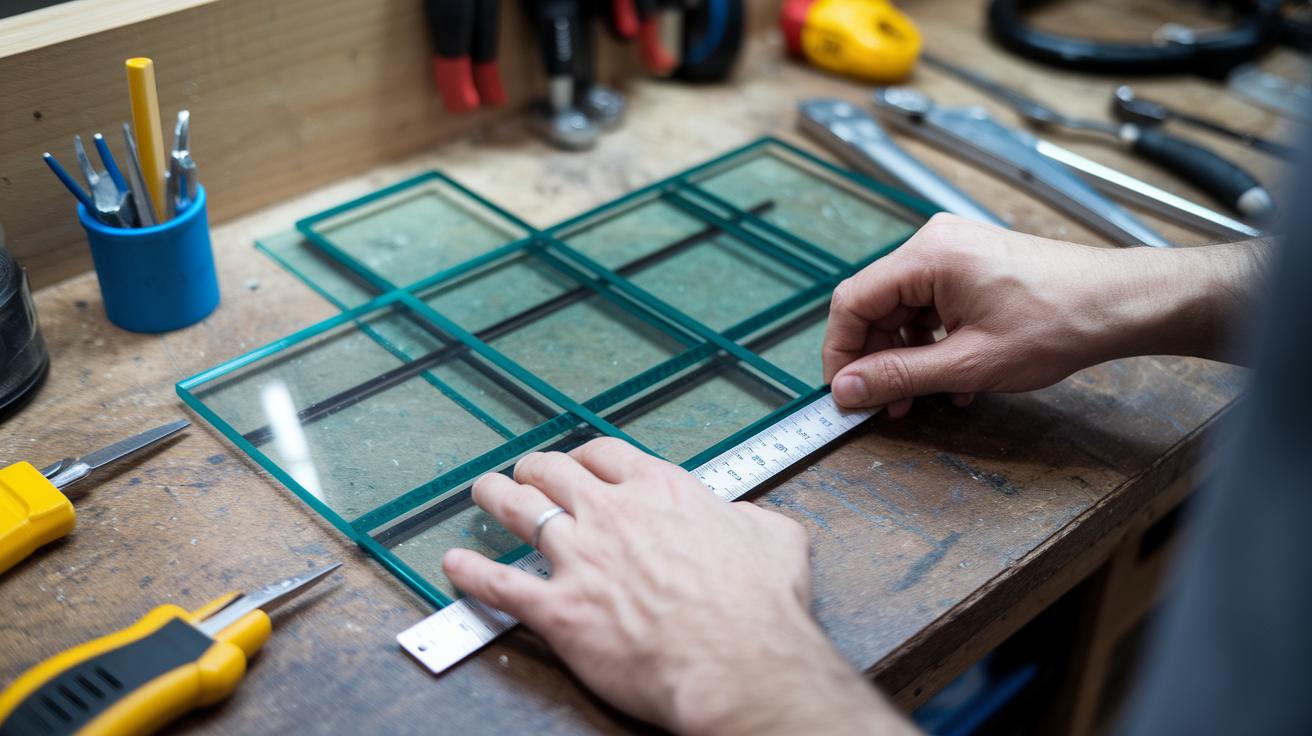
Measuring and Cutting Sump Panels
First, take your time to measure the space for your tank. Use your ruler or calipers to double-check each side, then get the glass cut or the acrylic neatly sawed to match your numbers. Always smooth out the edges with sandpaper, so they aren’t sharp and can keep both you and your fish safe. It’s much like double-checking a recipe to make sure every detail is just right!
Installing Baffles and Sealing Joints
Next up is placing your baffles in the sump exactly as planned. Use aquarium-safe silicone to secure the panels and make sure every joint is watertight. Remember, you won’t need much, just about half a tube should do it. Make sure you apply it evenly, as a careful setup prevents future leaks and keeps water flowing smoothly, much like how a steady current helps everything glide by effortlessly.
Filter Sock Holder Setup
Now, set up the filter sock holder. You can choose acrylic brackets or plastic clips for this part. Avoid glass because it tends to stick too much to the silicone, which can be a hassle later on when cleaning. Think of it as making a small, easy-to-reach storage spot for your filter media, so cleaning is a breeze whenever you need to.
Curing and Cleaning
After putting everything together, leave your sump setup in a spot with good air for 24 to 48 hours. This gives the silicone time to settle, just like the gentle settling of silt beneath a calm lake. As it hardens, you can trim off the extra bits and then clean away any debris. A neat surface goes a long way in making sure your sump works perfectly and stays clean.
Leak Testing and Adjustments
Finally, test your work by slowly filling the sump up to its normal water level. Watch closely at every joint and baffle to catch even the tiniest leak. If you spot a leak, simply reapply a bit more silicone or tighten things up until everything looks right. This last check lets you enjoy your aquarium without any unexpected surprises, keeping your underwater world safe and sound.
Plumbing Techniques for Your Custom Aquarium Sump
Start by adding bulkhead fittings to both the drain and return lines of your sump. Make sure the O-ring sits perfectly to keep everything watertight. I like to think of it as fitting together two puzzle pieces, each small detail plays a part in creating a flawless water flow.
Next, set up your overflow plumbing to handle bursts of extra water. Siphon loops help guide that surplus water gently back to your sump, and adding an emergency drain line will steer away any unexpected surges from your display tank safely.
Now, position your 150-200 GPH return pump with care. Connect it using either sturdy PVC or flexible tubing with barbed fittings. This setup keeps the water moving steadily across all parts of your sump, whether it’s the mechanical, chemical, or biological section, so your filtration works as smoothly as a quiet stream.
Finally, include check valves or gate valves in your design to control the flow and stop unwanted back-siphon. These valves give you the precise control you need to guide the water where it belongs. All in all, these techniques create a smooth, efficient circulation system that supports a healthy and vibrant aquatic world.
Troubleshooting and Leak Prevention in Your DIY Sump
Leaks in your sump often begin at the places where silicone meets panels, where bulkhead threads are loose, or where tiny cracks hide. It reminds me of how even the calmest water can hide an unexpected ripple. To catch these issues early, try a dry-dock test by filling each compartment one at a time. This way, you can easily spot any weak spots or areas where the silicone just didn’t bond right.
When you work on threaded fittings, wrap them with Teflon tape before you tighten things up. And a quick heads-up: tighten your bulkheads gently because overtightening can lead to cracked panels. If your return pump isn’t moving as much water as it should, give the valve settings a tweak or reposition the return line so that each compartment gets its proper flow.
If a leak just won’t quit, don’t hesitate to add extra silicone around the problem area to strengthen the seal. Always take a moment to inspect every connection closely; a well-assembled sump not only keeps water where it belongs but also helps your whole filtration system work as smoothly as a calm, clear stream.
Maintaining and Upgrading Your Custom Aquarium Sump
Keeping your sump in tip-top shape means giving it a little love every week. Start out by swapping your filter socks weekly, it’s like letting a cool summer breeze refresh your setup. Then, once a month, clean each compartment to clear away any little build-ups that might slow down the water flow.
Every three months, take a moment to check the silicone seals and bulkheads. Think of it as a quick health check for your sump, look for any signs of wear or sticky residue. If you spot any spots that need fixing, a touch of extra silicone will help secure your entire system.
Here are some fun upgrade ideas to make your sump work even better and save you time in the future:
- Add a refugium section for extra biological filtration.
- Switch to K2 media if you have a freshwater setup, which does a different kind of waste breakdown.
- Install an automated float switch to keep the water level just right.
- For saltwater tanks, try smoked baffles to help reduce algae and cut down on cleaning.
Also, keep an eye on your return pump. If you notice the water flow slowing down, take a closer look and replace the impellers if needed. This regular care not only extends the life of your sump but also keeps the whole filtration system running reliably.
In truth, a little routine attention turns your sump into a low-maintenance, efficient part of your aquarium. That way, you can spend more time enjoying the relaxing, vibrant world of your aquatic friends.
Final Words
In the action of setting up your optimal aquarium, you’ve seen how choosing a custom aquarium sump brings cost savings and better filtration. We covered everything from planning your layout to careful fabrication and smart plumbing. Each step, from glass selection to leak testing, plays a role in building a custom aquarium sump: a step-by-step guide for a balanced and vibrant habitat. Embrace the process, enjoy the reward of cleaner water, and watch as your aquatic world gently flourishes.
FAQ
How do you build a DIY sump filter for a freshwater aquarium?
Building a DIY sump filter for a freshwater aquarium means planning distinct spaces for mechanical, chemical, and biological filtration, choosing material like glass or kit components, and assembling them with accurate measurements for steady water flow.
How do you calculate an aquarium sump design?
Calculating an aquarium sump design starts by multiplying the sump’s length, width, and height to get volume, converting cubic inches to gallons, and then adding 50–100% extra capacity as a safety margin.
How big should a sump be for an aquarium?
Sump size is determined by your aquarium’s water volume and equipment needs; it should be large enough to allow a 50% additional safety reserve to handle extra water from the display tank.
How should a sump be set up?
A proper sump setup involves arranging compartments for different filtration types, installing baffles and secure plumbing, and testing for leaks to keep water circulation smooth and reliable.
What benefits does a seamless sump offer compared to a canister filter?
A seamless sump provides integrated, customizable compartments with straightforward maintenance and improved flow, while a canister filter is a closed, compact unit that can be easier to install but less flexible for upgrades.