
Ever thought your planted tank could sparkle with life just by adding a bit of gas magic? A CO2 system might be just what you need to give your underwater plants a natural boost.
I’m here to walk you through every step in a clear, friendly way. Think of it like setting the stage for a special underwater performance, each part plays its important role in the show.
Ready to dive in? Let’s explore how to set up your CO2 system easily and watch your aquarium transform into a vibrant, living scene.
Step-by-Step CO2 System Installation for Planted Aquariums
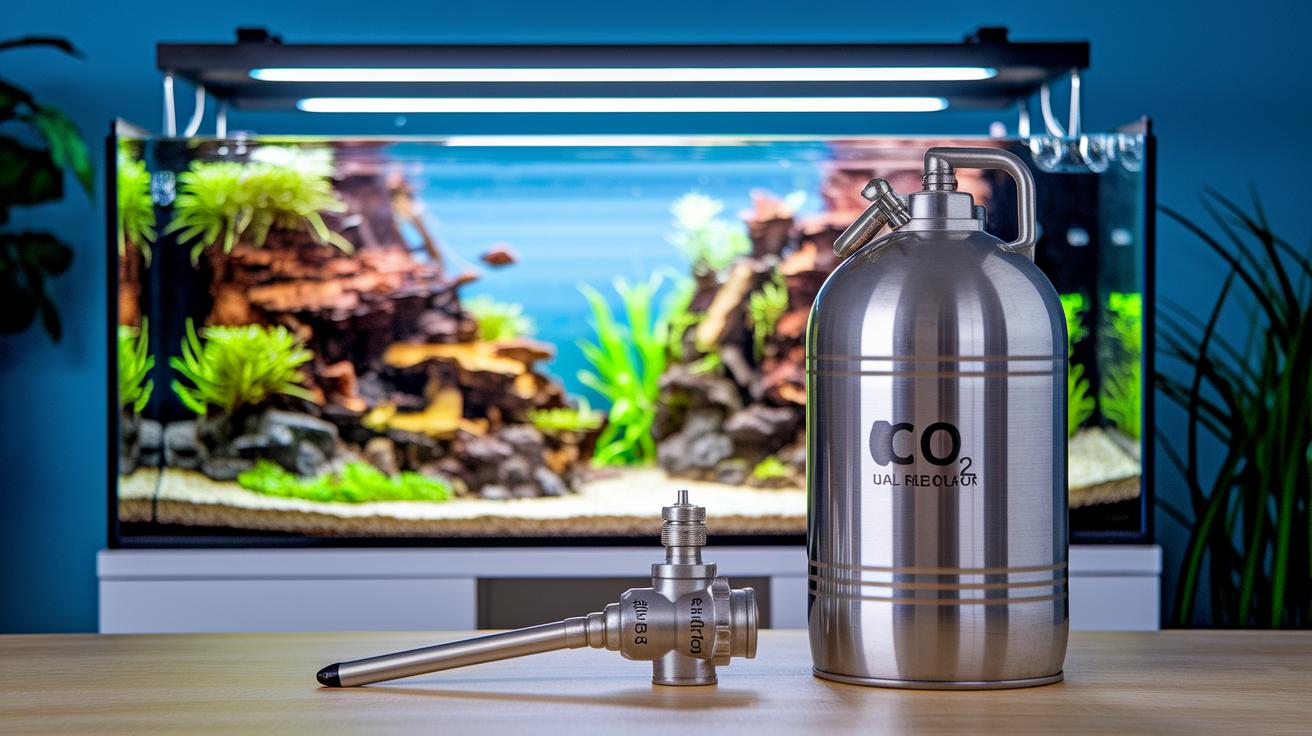
First, grab your metal CO₂ cylinder. If you have a 40-gallon tank, choose a 5 lb bottle; for a 60-liter tank, go with a 3 L bottle. Place it on a sturdy stand so it stays safe, just like setting a solid base for your underwater garden.
Next, attach the dual-stage regulator that comes with a solenoid and a needle valve. Tighten all the fittings until they’re snug. It’s like sealing the lid on a secret recipe where every twist helps keep the water flowing perfectly.
Then, hook up the bubble counter to the regulator’s outlet. This little tool lets you check that your gas is moving at about one bubble per second, aiming for roughly 30 ppm. Imagine it as a gentle spray of bubbles, each one helping your plants grow strong and vibrant.
After that, run the CO₂-specific tubing from the bubble counter to your diffuser. Whether you go with a ceramic-membrane diffuser inside the tank or an inline diffuser attached to the filter return line, make sure the tubing is clamped securely along the rim of your tank for a neat look.
Now, set the diffuser near the filter outlet so that the water moving out mixes well with the injected CO₂. This mix is essential for turning your tank into a lively aquatic scene.
Below is a quick components checklist:
| Component | Description |
|---|---|
| CO₂ Cylinder | 5 lb for 40 gal or 3 L for 60 L |
| Regulator | Dual-stage with solenoid |
| Bubble Counter | Monitors the bubble rate |
| Diffuser | In-tank or inline design |
| Tubing | CO₂-specific, securely clamped |
Finally, set the solenoid timer to start the CO₂ injection 2 to 3 hours before your lights come on. Check your measurements with a pH-KH test or drop checker to make sure your setup is just right.
Selecting CO₂ Components and Materials for Planted Tanks
When setting up your planted tank, start by picking the right cylinder. A 5 lb steel bottle can feed a 40-gallon tank for about 3–4 months, with refills costing less than $5 each month. It’s like giving your tank a cool, steady boost without breaking the bank. If your setup is a bit smaller, a 3 L cylinder fits a 60-liter tank and lasts between 2 and 4 months, depending on how many bubbles you let loose.
Next, grab a dual-stage regulator with a solenoid and needle valve. This device helps you control your CO₂ like a pro, thanks to two handy gauges showing both cylinder and working pressures. Imagine turning a dial and knowing exactly how your gas is flowing. Some regulators even offer warranties up to 10 years, letting you relax and enjoy a decade of smooth performance.
Now, think about the diffuser that best suits your aquarium. A ceramic-membrane in-tank diffuser spreads CO₂ evenly, creating a gentle, natural look. If your tank needs a bit more mixing power, consider an inline atomizer or reactor. And remember, using thicker, stiff CO₂-rated tubing is key to handling the pressure, like picking the sturdiest net for your underwater world.
| Component | Details |
|---|---|
| Cylinder Options | 5 lb for 40 gallons (3–4 months, <$5 refill) or 3 L for 60 liters (2–4 months, bubble rate dependent) |
| Regulator Features | Dual-stage design, solenoid, needle valve, dual gauges, up to 10-year warranty |
| Diffuser Types | Ceramic-membrane in-tank, inline atomizer, reactor |
| Tubing | Thicker, stiff CO₂-rated tubing to handle working pressure |
For more details, check your basic setup instructions or explore the FAQ section. Setting up your tank is a bit like watching gentle ripples on water, each step brings you closer to a beautiful, thriving underwater world. Enjoy the journey!
Preparing Your Aquarium Environment Before CO₂ Installation
Start by checking your tank’s pH and KH levels. This is like taking a deep look at your water's natural personality before adding any extra CO₂ magic. It’s similar to a chef tasting a sauce before adding spices, simple and essential to know what you’re working with.
Next, get your substrate in shape. Spread a rich, nutrient-packed layer evenly across the bottom so your plants have a strong foundation. Think of it as preparing a cozy bed for your underwater garden where every plant feels supported and ready to grow.
Then, make sure your tank’s temperature sits nicely between 74 and 82°F. This, along with a good filtration system, helps keep the water as clear as a gentle stream. It’s just like imagining your tank as a small river, where the steady flow of water keeps everything fresh and clean.
Finally, confirm that your water moves well enough for good circulation. Proper turnover helps mix the added CO₂ evenly, ensuring that every little plant leaf gets a taste of the nourishment it needs to flourish.
Setting Up Your CO₂ Diffusion System and Tubing Connections
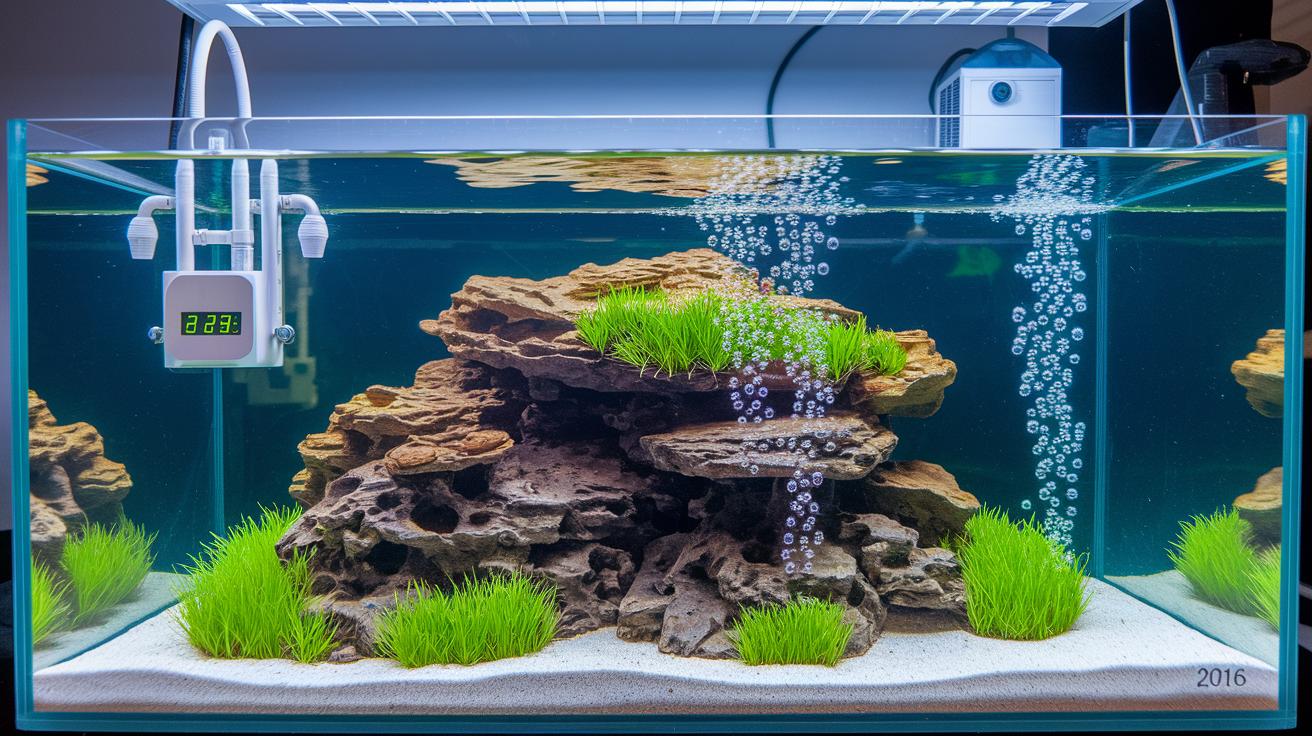
Start by connecting your CO₂ tubing from the regulator to the bubble counter. Watch closely to see about one bubble per second, it's like witnessing tiny dancers twirling in a calm stream. Next, run the tubing from the bubble counter to the diffuser, which sits right after the filter outlet where clean water and CO₂ come together like cream swirling into coffee. Use clips to fasten the tubing along the tank rim, keeping everything neat just like a kite flying tethered on a breezy day.
Now, gently adjust your tubing so there are no sharp bends or loops that could disturb the bubble flow. Use the bubble counter as your guide to spot any blockages or hiccups in the system. Also, fine-tune the water current to make sure it holds the CO₂ well, neither pushing it to the surface too quickly nor mixing it too softly.
| Step | Instruction |
|---|---|
| 1 | Ensure the bubble rate stays steady at about one bubble per second. |
| 2 | Fasten the tubing securely with clips along the tank rim. |
| 3 | Keep the tubing layout smooth, avoiding any sharp bends. |
| 4 | Monitor the setup with the bubble counter to catch any blockages. |
Finally, tweak your setup until each bubble dissolves perfectly, giving your aquatic plants a steady, enriching dose of CO₂.
Calibrating CO₂ Flow and Monitoring Aquarium Parameters
When you first set up your tank, start by dialing your CO₂ flow to one bubble per second. This helps you aim for about 30 ppm with the pH-KH method, giving your plants a healthy dose of carbon dioxide much like a steady stream refreshes a quiet pond.
Then, adjust slowly by changing the flow in small steps of 0.5 bubble per second. For example, if you begin with one bubble per second, just a tiny increase can really change things, like adding a pinch of salt to your favorite recipe. Be sure to jot down each change so you can see what makes your tank thrive.
Next, put a drop checker loaded with a 4 dKH solution near your plants. This tool acts like a quick-look meter, showing you a visual hint of how your pH levels are doing alongside your regular measurements.
Finally, set your solenoid timer so that the CO₂ kicks in a couple of hours before your lights switch on and turns off about 30 minutes before they go out. This helps your aquatic garden enjoy steady CO₂ throughout the day, just as a gentle sunrise and sunset bring balance to nature.
Safety Measures and Best Practices During CO₂ Installation

First, give every connection a little check with a leak test. Take some soapy water and gently brush it over your fittings. Watch as tiny bubbles appear, if they do, it means a leak is there. Just like spotting a small crack in a calm pond, snug up the fittings until those bubbles disappear.
Next, add a check valve between your bubble counter and the diffuser. This small gadget helps keep water from sneaking back into your gas setup, protecting important parts like your regulator. It’s like putting a little guard at the water's door.
Also, be sure to secure your CO₂ cylinder while it stands upright. Use straps or a sturdy stand, much like anchoring a cherished piece of aquarium décor. This way, you avoid any unwanted tipping, keeping everything steady and safe.
When it comes to tubing, only choose high-pressure rated ones. Make sure all connectors are tightly in place with no kinks to mess up your gas flow, similar to keeping a smooth current in your tank.
Finally, make sure your tank has gentle surface movement. This soft agitation helps oxygenate the water, keeping your fish happy while the CO₂ does its magic. Always take a moment to double-check every step before powering things on to ensure your aquatic friends are safe and thriving.
Routine Maintenance and Troubleshooting for CO₂ Systems
Hey there, fellow fish lover. Start by checking your cylinder gauge every month and get a refill of your 5 lb bottle every 3 to 4 months. Think of it as giving your tank a quick check-up to keep your underwater garden happy and healthy.
Every 4 to 6 weeks, clean your ceramic membrane diffuser. It's a bit like tidying up your tank’s filter, removing any clogs so the CO₂ can mix evenly and help your plants grow strong.
When things seem off, watch for a few clues:
- A sudden burst of algae could mean you're over-gassing or there’s a mix-up with nutrients.
- If some plants don’t seem to keep up, it might be a sign that the CO₂ isn’t spreading right.
- If you notice the bubbles aren’t coming out steady, like if they stray from that calm one bubble per second, it could point to a hiccup with your solenoid or regulator.
Keep adjusting your flow and timer settings as the seasons change and your plants’ needs shift. This little tune-up helps your CO₂ system keep your underwater scene vibrant and full of life.
Final Words
In the action steps covered, you learned a clear way to set up your CO₂ system. We walked through picking the right pieces, prepping the tank, connecting tubing, calibrating flow, and keeping everything safe. Each part works together to create a clean, balanced underwater space that looks as lovely as it feels. This guide shows how to install a CO₂ system for planted aquariums so your aquatic world stays healthy and inviting. Enjoy watching your underwater friends thrive!
FAQ
How do you install or add a CO₂ system for a planted aquarium?
The installation guides explain that you start by securing the cylinder, attaching a regulator and bubble counter, running tubing to a diffuser, and setting a timer for proper CO₂ dosing.
What does CO₂ in an aquarium mean for beginners?
The beginner advice on CO₂ explains that a simple system uses a cylinder, regulator, bubble counter, and diffuser to boost plant growth by adding controlled gas to the water.
How do you add CO₂ to an aquarium naturally?
The natural CO₂ method involves using organic processes like fermentation, though these techniques often lack the consistency that a standard CO₂ injection system provides for steady plant support.
What is included in an aquarium CO₂ kit or system?
The kit or system typically comes with all the necessary parts such as a gas cylinder, dual-stage regulator, bubble counter, tubing, and a diffuser, giving you a ready-made solution for your planted tank.
What is the best CO₂ system for an aquarium?
The best CO₂ systems offer reliable components like a robust regulator, clear bubble counter, durable diffuser, and quality tubing to achieve balanced gas distribution that suits your aquarium’s needs.
How does a CO₂ regulator work in an aquarium?
The CO₂ regulator adjusts the gas flow from the cylinder to the system by using a dual-stage design, ensuring a controlled, safe, and steady CO₂ delivery to your planted tank.
Is CO₂ really necessary for a planted aquarium?
CO₂ is not strictly required but it significantly benefits plant growth by enhancing photosynthesis, leading to healthier and more vibrant aquatic plants in your aquarium.
How often should you add CO₂ in a fish tank with plants?
The guidance is to inject CO₂ during and shortly before the light period so that plants receive sufficient gas when they photosynthesize, aligning dosing with your aquarium’s lighting schedule.
How much CO₂ should you use for a 30-gallon tank?
The recommendation for a 30-gallon tank is to start with about one bubble per second, which typically targets around 30 ppm of CO₂, and fine-tune using a drop checker or pH-KH test.